Please see
HEREZeiss Stereotar 3D And
HEREStitz 3D Stereo SV-1
If people were meant to see 3D movies they would have been born with two eyes. Sam Goldwyn
Stereo Photography is called Stereoscopy
Stereoscopy creates the illusion of three-dimensional depth from given two-dimensional images.
Human vision, including the perception of depth, is a complex process, which only begins with the acquisition of visual information taken in through the eyes; much processing ensues within the brain, as it strives to make sense of the raw information. One of the functions that occur within the brain as it interprets what the eyes see is assessing the relative distances of objects from the viewer, and the depth dimension of those objects. The cues that the brain uses to gauge relative distances and depth in a perceived scene include.
How does Stereoscopy work?
It uses two photos of the same subject. One offset in some way or other from the other. The two images are then merged by our eyes to create a photo with three dimensions not two. The separation between our human eyes is called the Interocular distance. As a rule of thumb this distance is 65mm.
Basically one uses two images at slightly different angles to create stereopsis vision with the camera. Seeing the image from different perspectives brings depth and body to the photo. We are still looking at the flat photo. But the effect of the two offset images tricks our brain into thinking there is depth.
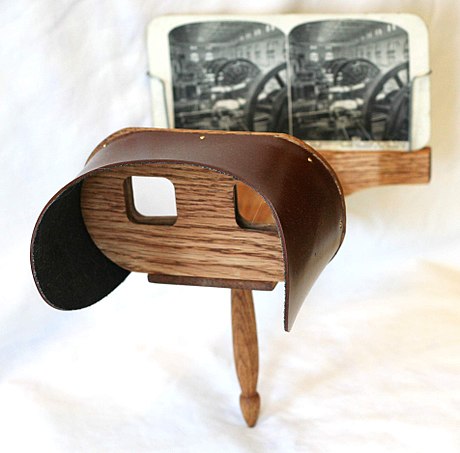
The first development came in 1833 when Sir Charles Wheatstone invented the stereoscope. You look into this device, and two separate images of the same scene are displayed. There is one image for each eye. Your brain puts them together, and you get a 3D image.
Wheatstone’s stereoscope used illustrations. But William Henry Fox Talbot and Sir David Brewster developed the idea using photographs. This invention developed into the Viewmaster. Something you can still buy today.
In 1851 stereo daguerreotypes were exhibited for the first time to the general public at the London International Exhibition (Crystal Palace). By 1860 both amateur photographers and publishing firms were making stereographs. The major stereo publishers sold their views by mail order, door-to-door salesmen, and in stores. Stereographs were sold individually and in boxed sets.
Because the stereoscope preceded the publication of photographs in newspapers and magazines, stereo viewers were seen as forms of entertainment. People would pass around the stereoscope and see all sorts of beautiful scenes that they otherwise might never have been introduced to.
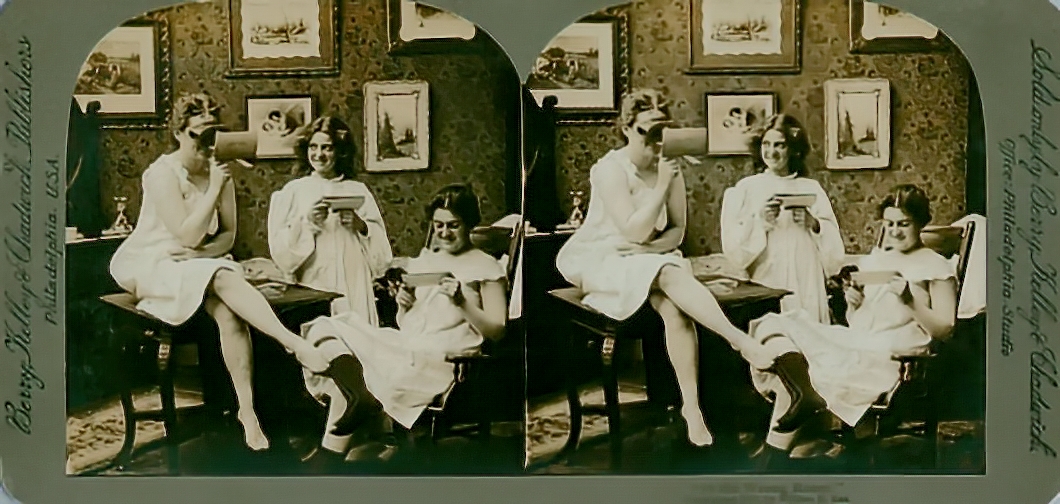
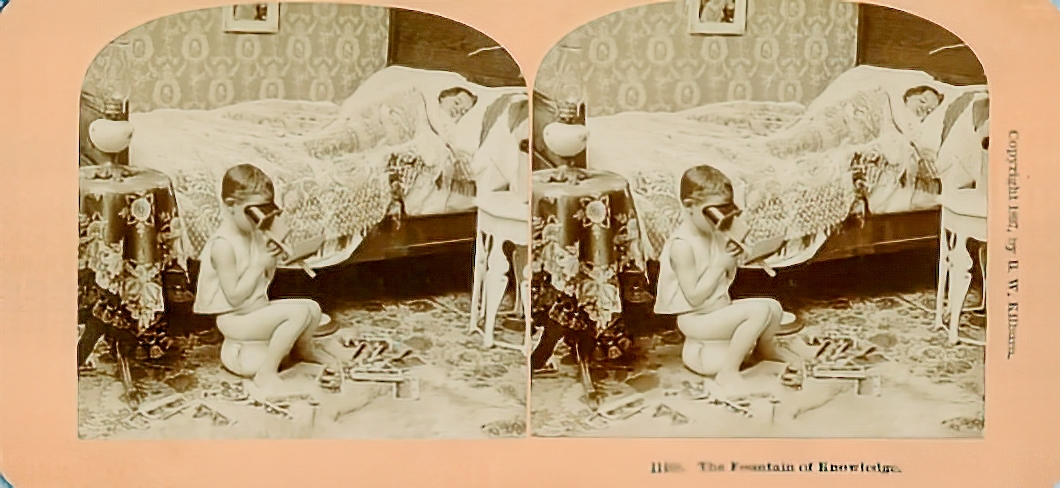
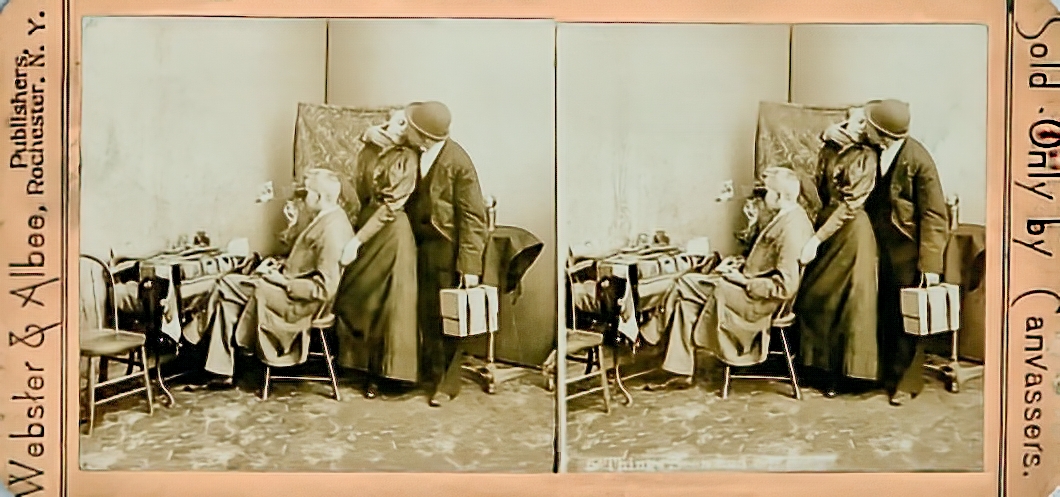
Stereographs were collected by many middle-class families in the late 19th century. People acquired stereographs of tourist sites they had visited, as well as exotic locales that they would only experience through the wonder of the stereoscope. Viewing stereographs was a common activity, much like watching television or going to the movies today. Stereoviews were also used as an education tool in classrooms.
All ages were hooked into the technology of the time.
The first effect of looking at a good photograph through the stereoscope is a surprise such as no painting ever produced. The mind feels its way into the very depths of the picture. The scraggy branches of a tree in the foreground run out as if they would scratch our eyes out. The elbow of a figure stands forth so as to make us almost uncomfortable
Then there is such a frightful amount of detail, that we have the same sense of infinite complexity which Nature gives us. A painter shows us masses; the stereoscopic figure spares us nothing.
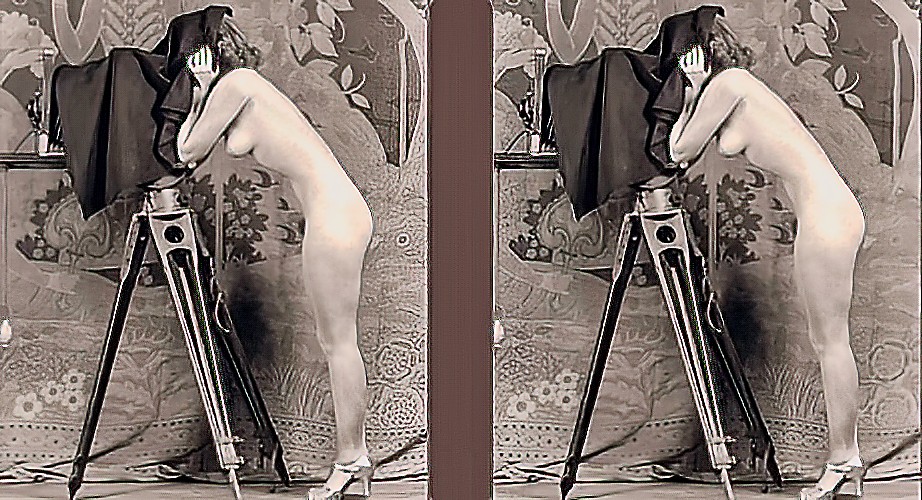
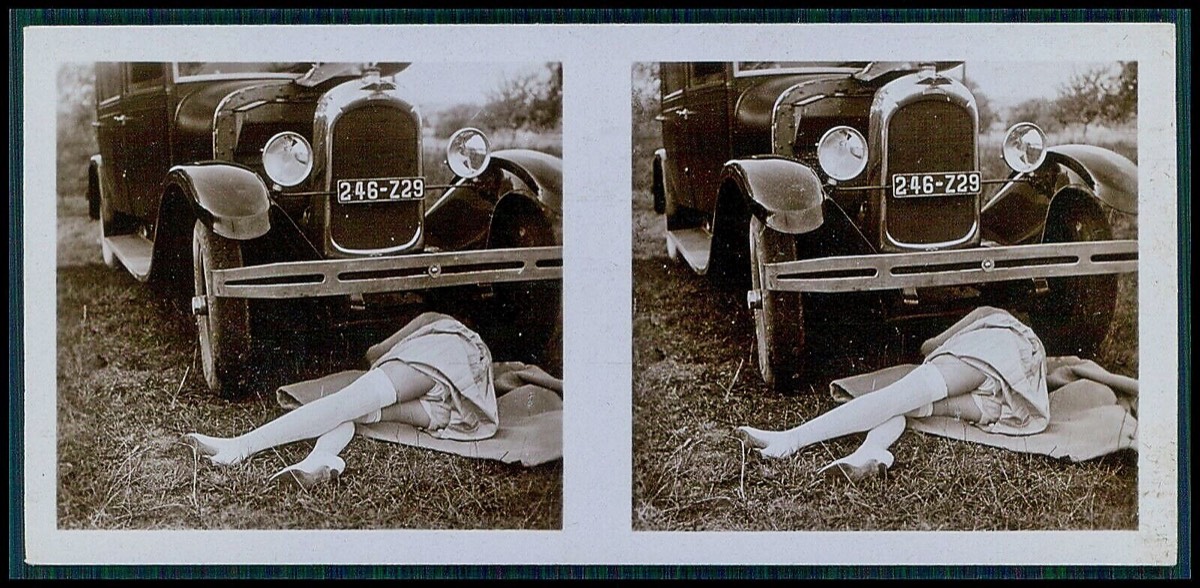
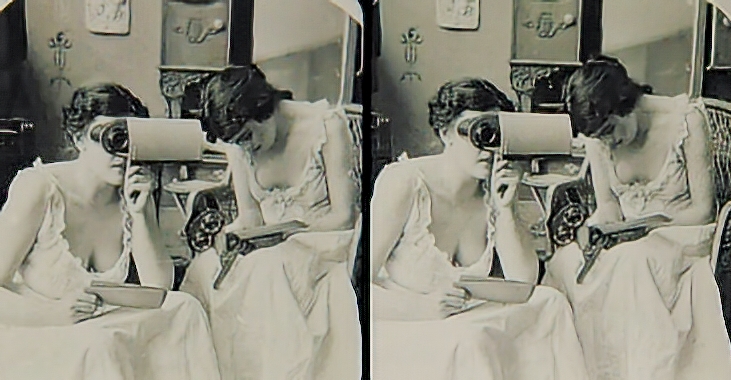
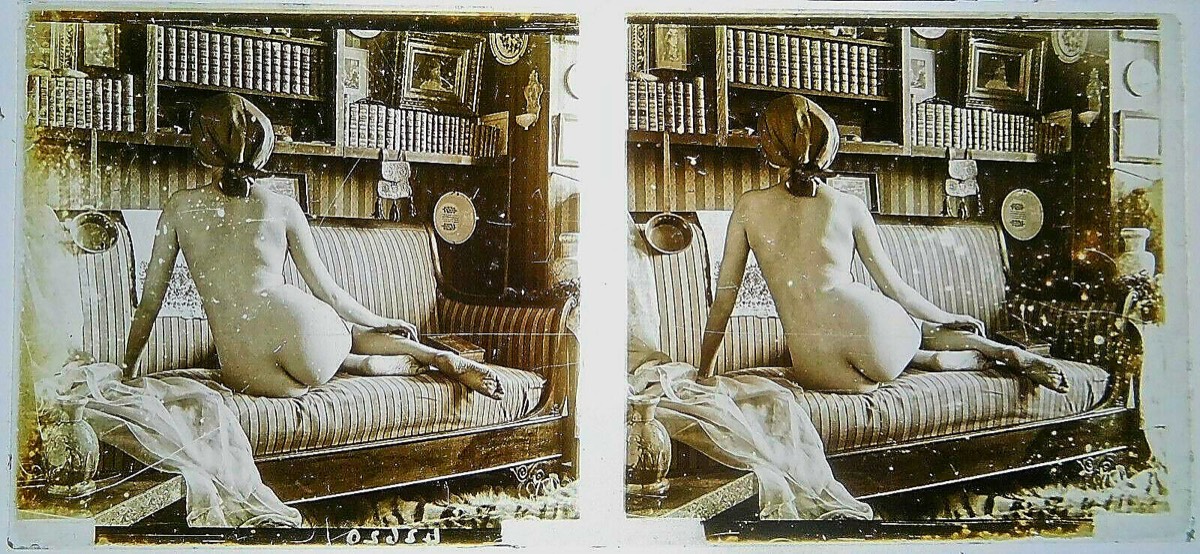
Quickly the stereo system was also being adopted for erotic images as well as science views.
Video on Stereo Photography
The Stereo Camera
The stereoscope uses two photos to create the 3D image in your mind. It is not a 3D photo. But as technology developed through the early 20th century, these ideas were adopted by camera manufacturers.
In the 1940s, we saw the first mass produced stereo camera. The camera uses two separate lenses and sensors to capture the same scene from different angles. These simulate human binocular vision and create a three-dimensional image.
The first stereo camera was the Stereo Realist, which hit the market in 1947.
Kodak Stereo Realist 1947
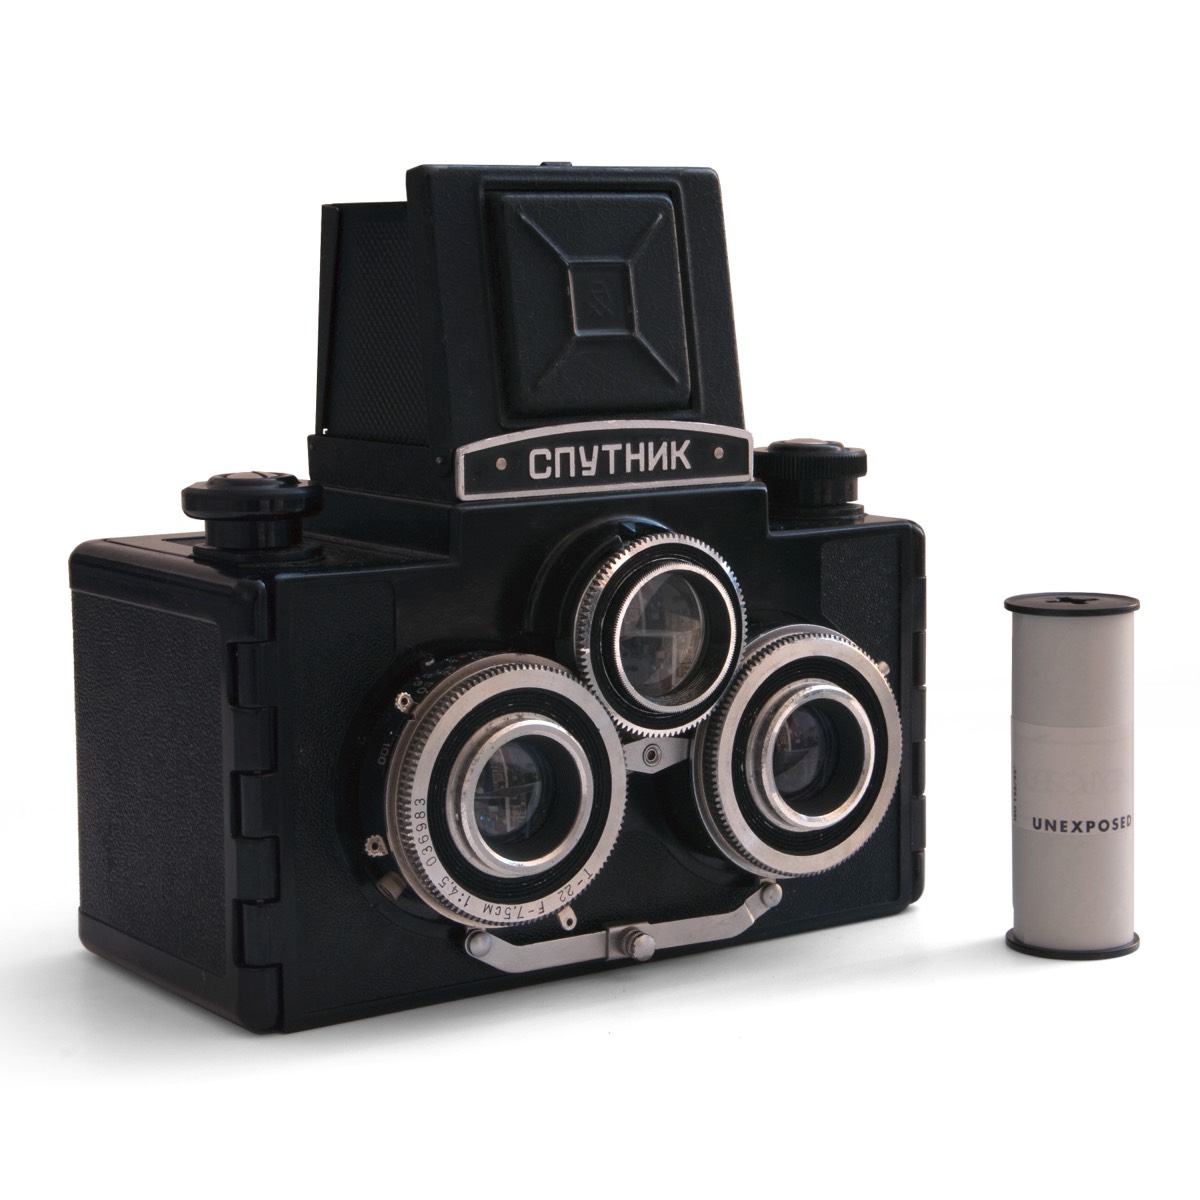
This Kodak Stereo Camera followed this in 1954. And the Russian Sputnik stereo camera in 1955.
Russian Sputnik stereo camera in 1955.
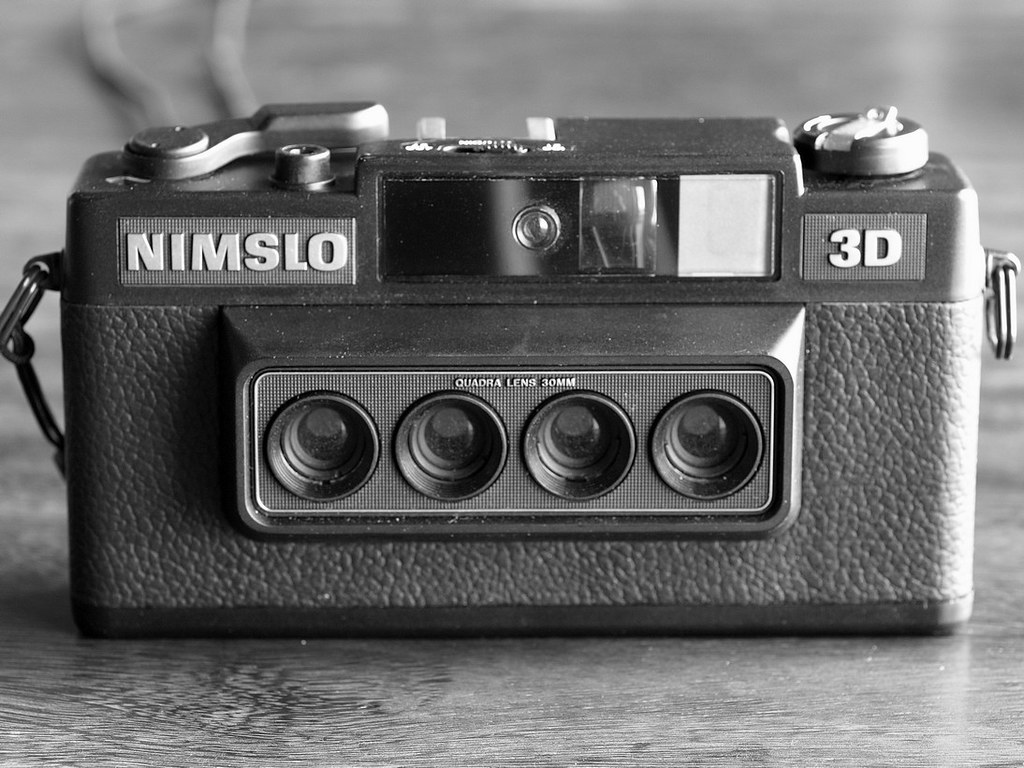
The Nimslo 3D was the first compact 3D camera for consumer use. It was released in the 1980s and used 35mm film
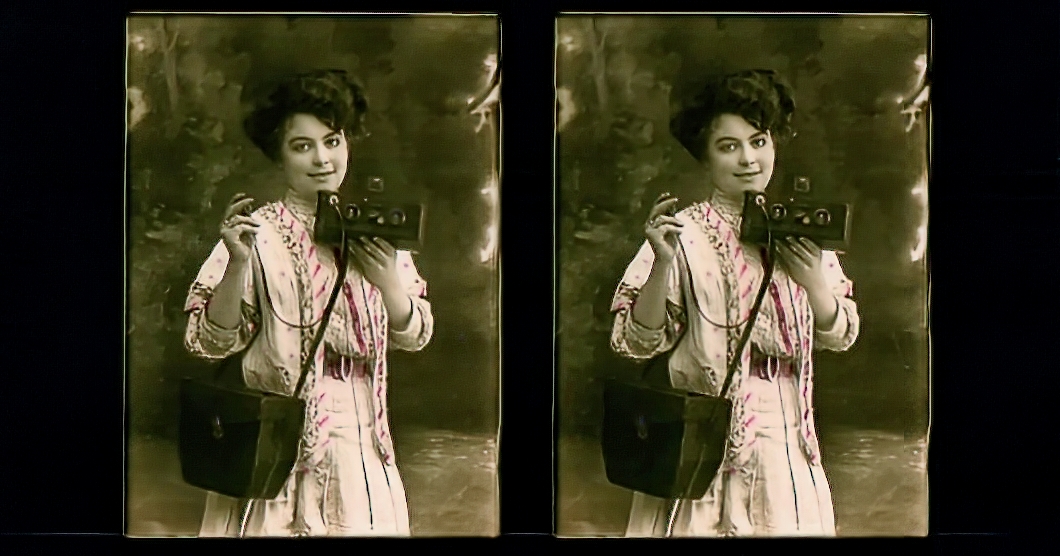
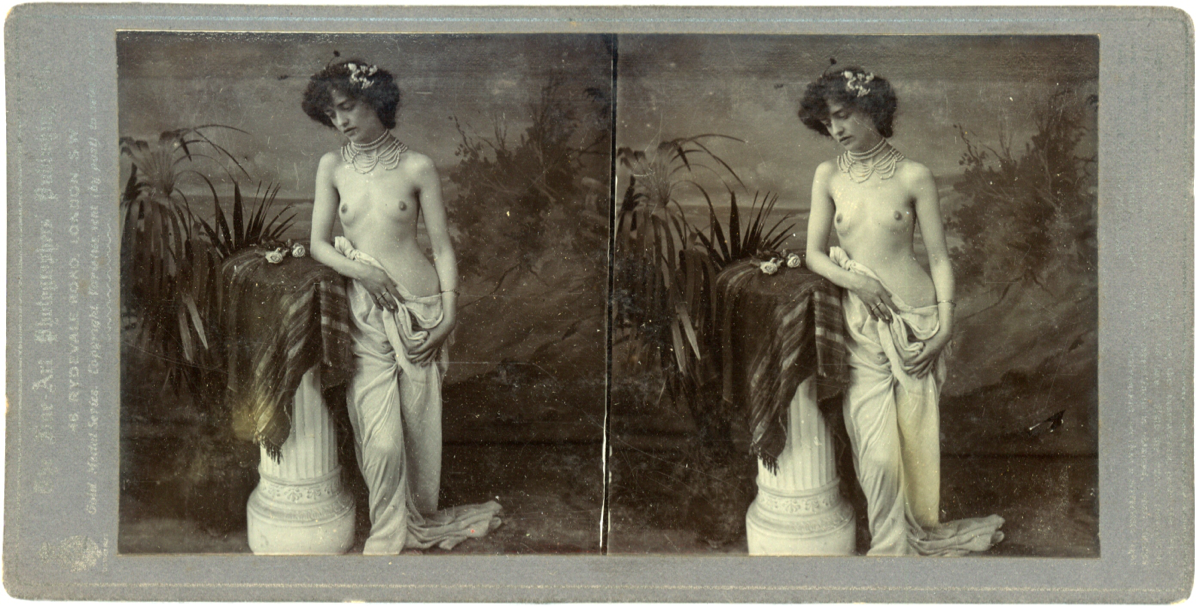
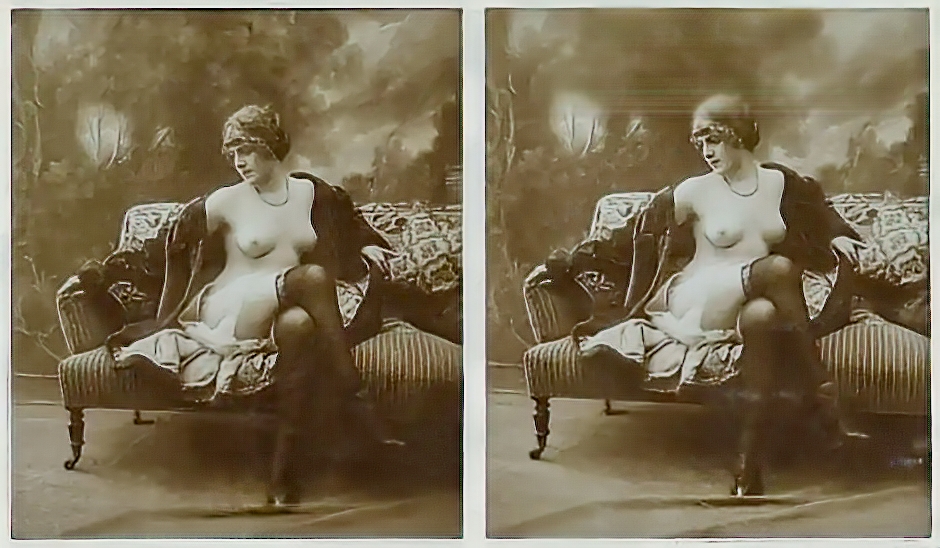
Models were used to sell cameras even back then and indeed erotic photography is almost as old as photography itself. Stereoscopic images of nude females were made by photographers like Auguste Belloc and Félix-Jacques Moulin in the 1850s. Erotic images became widely available in the beginning of the 20th century.
Many of the erotic images were a recreation of paintings by the masters.
The history of Stereo Photography
Remember this was the main form of entertainment in middle class families, no TVs, cinemas, or mobile phones.
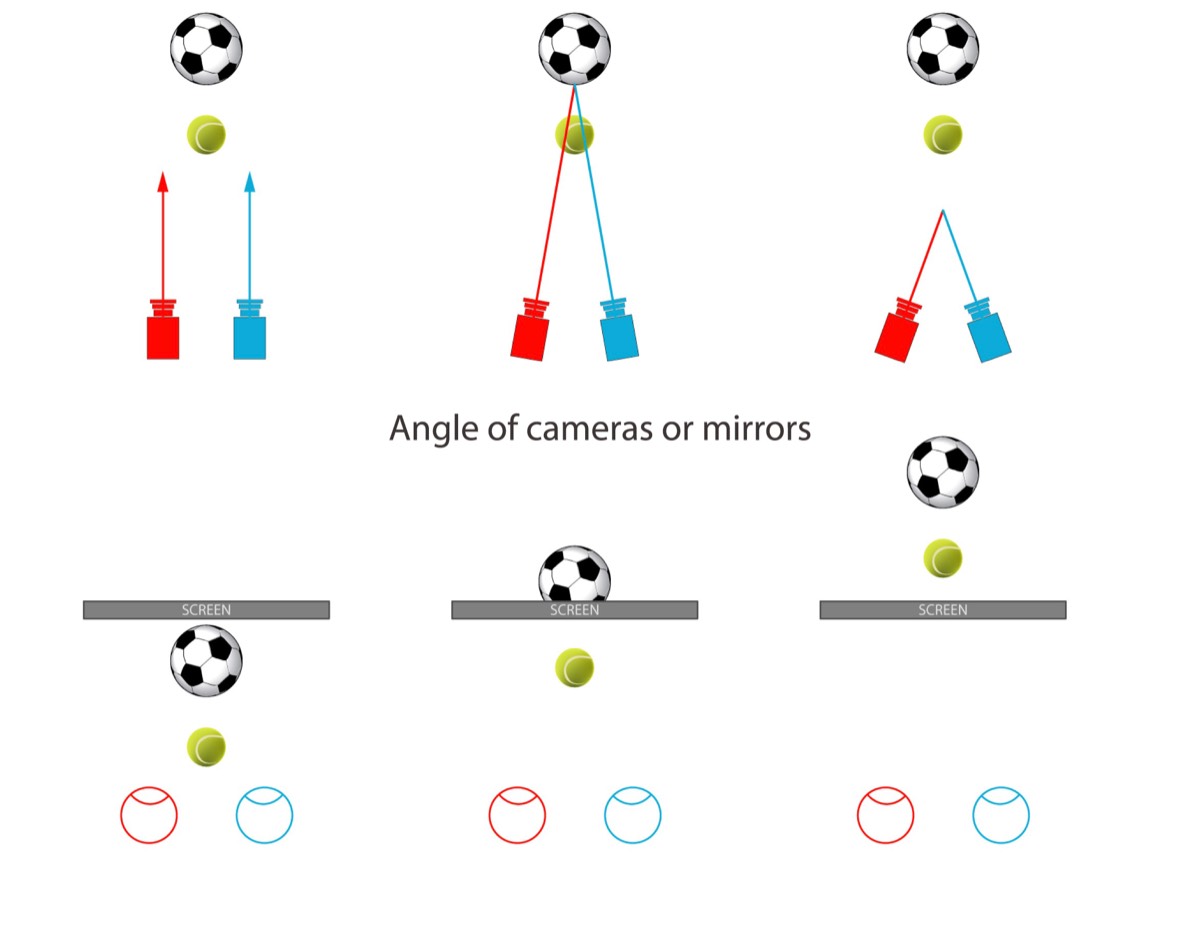
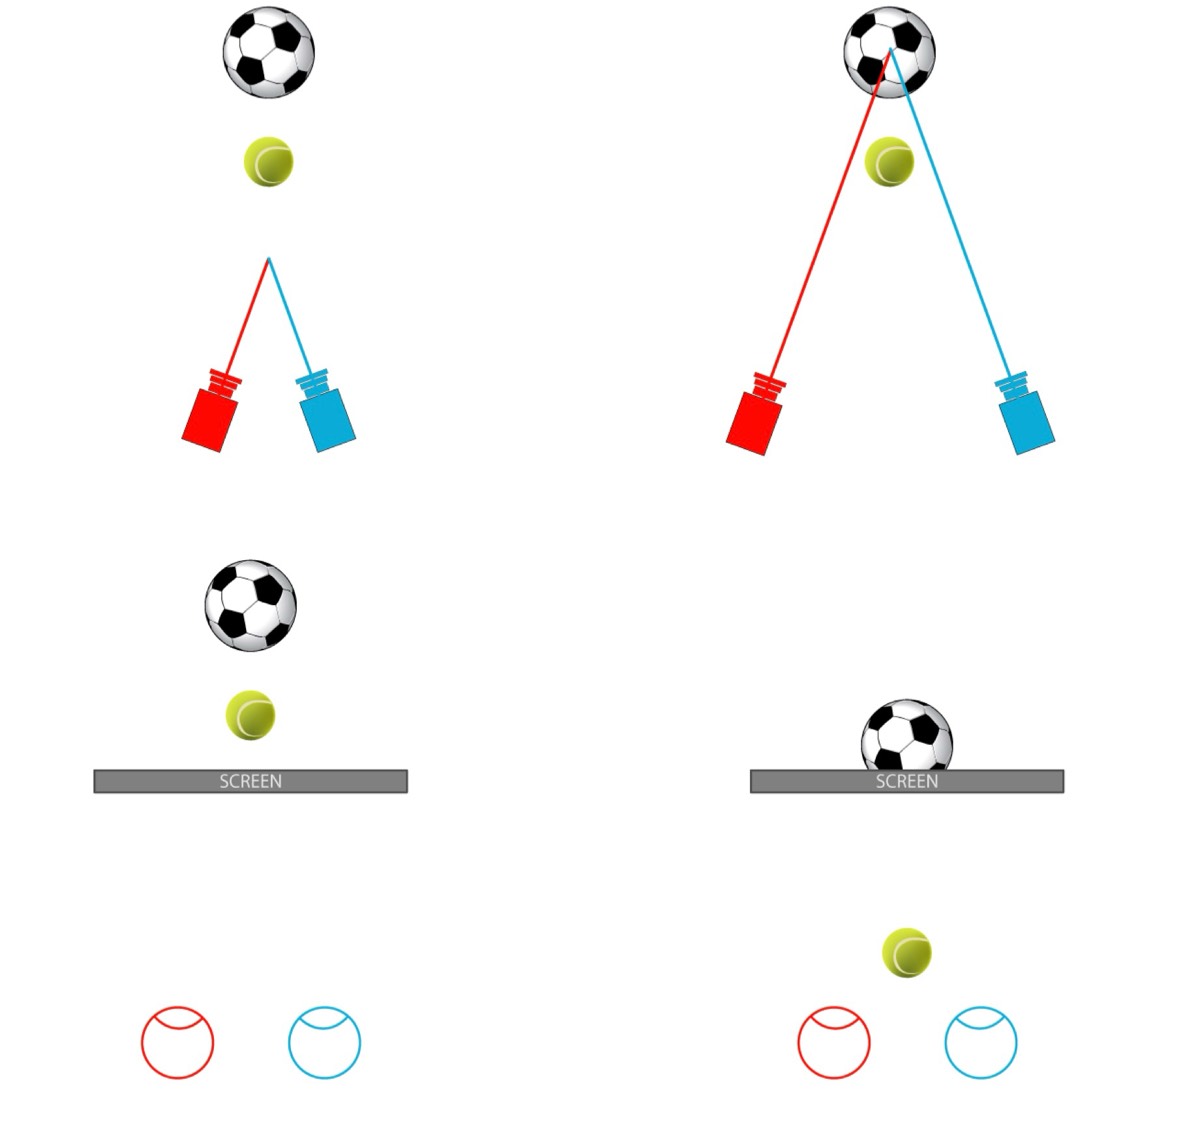
Camera Position
The images here particularly the one below show the secret to good stereo photography. You need clear distinct layers separated by distance to get a good effect.
To avoid eyestrain and distortion, each of the two 2D images should be presented to the viewer so that any object at infinite distance is perceived by the eye as being straight ahead, the viewer's eyes being neither crossed nor diverging. When the picture contains no object at infinite distance, such as a horizon or a cloud, the pictures should be spaced correspondingly closer together.
The position of the cameras and the angle to the subject makes a big difference to the 3D effect.
The convergence point determines where the object appears in relation to the image.
Convergence can be adjusted by toeing-in (an inwardly-angled adjustment) of the camera lens or by horizontal image translation (H.I.T) in post-production.
Simultaneously manipulating both the convergence and the interaxial gives control over the depth, and the placement of objects within that 3D space.
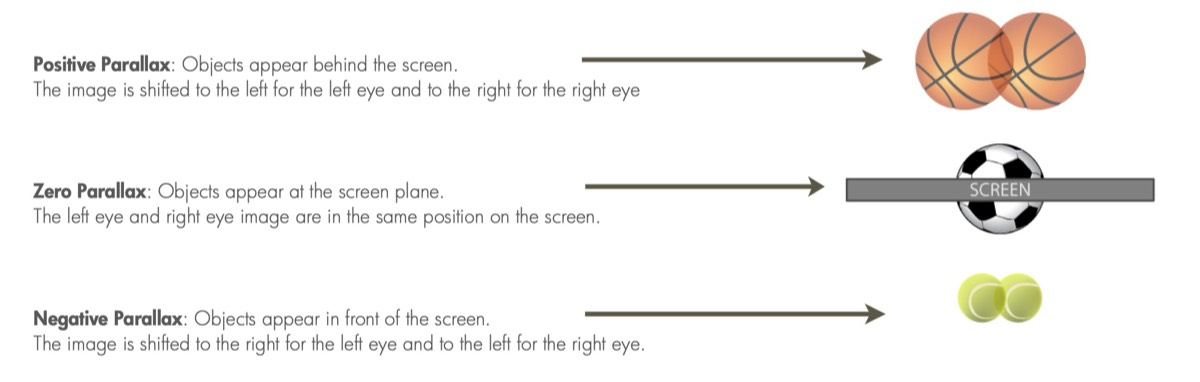
Parallax is created by the separation of the left and right images. We can also refer to this as The Depth Budget as it describes the limits for negative parallax (in front of the screen plane) and positive parallax (behind the screen plane). Keeping within the depth budget will ensure that eye strain is kept to a minimum – it‟s all about what‟s comfortable to watch not just for a few minutes but for two to three hours at a time for a movie.
You might be surprised how comparatively small parallax changes are needed to produce Stereo3D. For example, Sky TV in the UK recently prescribed a Depth Budget of 2% positive parallax and 1% negative parallax (measured as a percentage of the width of the frame) for the vast majority of the material with short term impact effects not exceeding 4% and 2.5% respectively.
Once the two parallax images have been taken if they are then placed side by side most people can, with practice and some effort, view stereoscopic image pairs in 3D even without the aid of a stereoscope, but the physiological depth cues resulting from the unnatural combination of eye convergence and focus required will be unlike those experienced when actually viewing the scene in reality especially with negative parallax, making an accurate simulation of the natural viewing experience impossible and tending to cause eye strain and fatigue in the viewer
So we can see now how each scene you create has a maximum amount of usable depth within which to create effective 3D.
When objects are placed too far in front of the screen AND too far behind the screen at the same time (too much depth), the viewer will not be able to fuse the stereo 3D image.
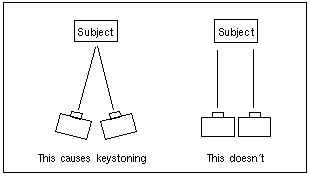
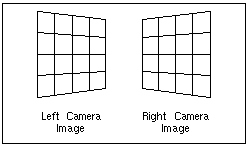
So we just need two mirrors or cameras right? No, unfortunately it is not that simple. If you take two pictures as shown in the illustrations here and above, you will get keystoning.
The left camera will make a picture with the small ends of the keystones on the right, while the right camera will have make a picture with the small ends of the keystones on the left, like this:
When you go to merge those two pictures in a viewer, you're going to have trouble. The flat wall becomes warped. If the keystoning is severe the pictures will be painful to view if they can be merged at all. As with a lot of these things, you can get tangled up. The first thing you're going to think is that the left illustration shows how your eyes see things. That's right. But remember your eyes are being presented with an evenly gridded wall in real life so they must be presented with the same thing in the viewer.
Viewing Stereo Images
Stereocards
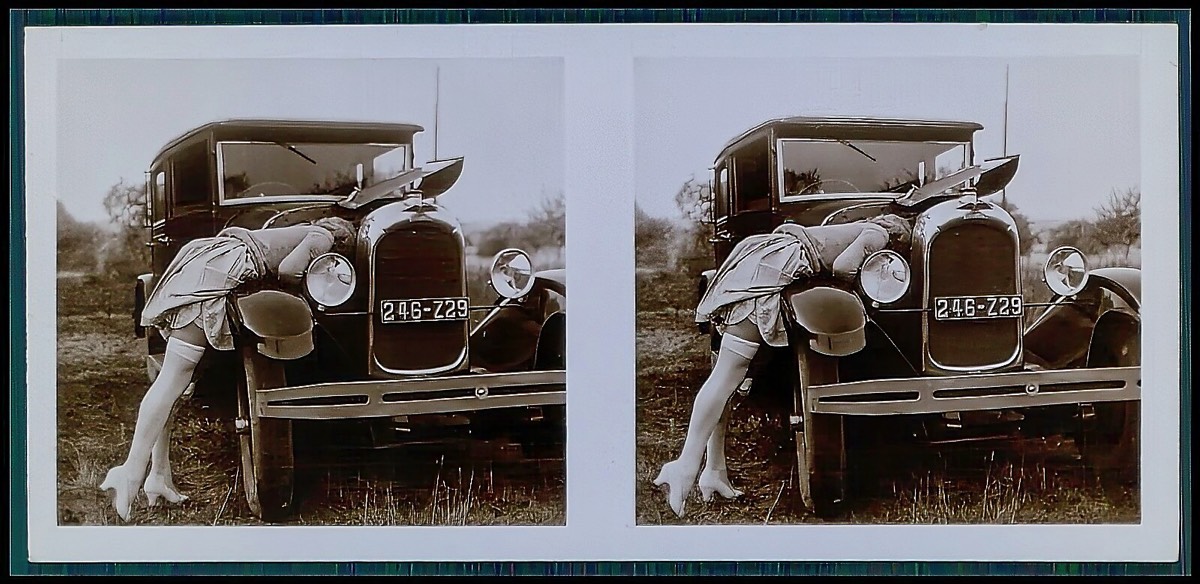
Stereocards first appeared in the mid 1800s and are still a great experience. They are usually two pictures mounted side by side on a 3.5 x 7" inch card that create a remarkable feeling of depth and dimension.
The advantages of side-by-side viewers is the lack of diminution of brightness, allowing the presentation of images at very high resolution and in full spectrum colour, simplicity in creation, and little or no additional image processing is required. Under some circumstances, such as when a pair of images is presented for freeviewing, no device or additional optical equipment is needed.
The parallel viewing method uses an image pair with the left-eye image on the left and the right-eye image on the right. The fused three-dimensional image appears larger and more distant than the two actual images, making it possible to convincingly simulate a life-size scene. The viewer attempts to look through the images with the eyes substantially parallel, as if looking at the actual scene.
The principal disadvantage of side-by-side viewers is that large image displays are not practical and resolution is limited by the lesser of the display medium or human eye. This is because as the dimensions of an image are increased, either the viewing apparatus or viewer themselves must move proportionately further away from it in order to view it comfortably. Moving closer to an image in order to see more detail would only be possible with viewing equipment that adjusted to the difference.
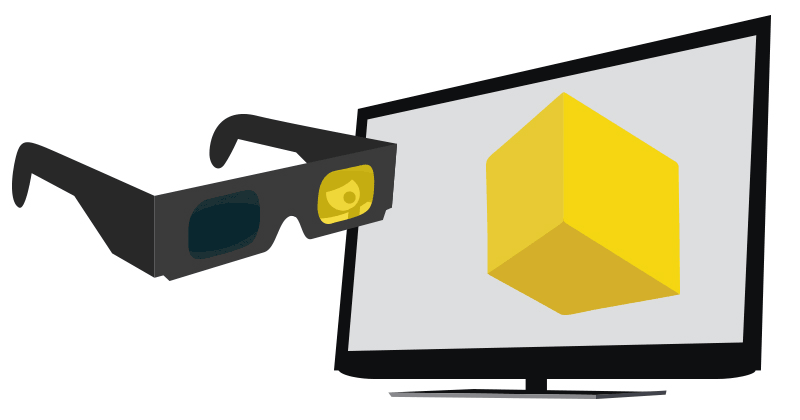
Of course 3D TV and cinema does not have two images next to each other. They are superimposed on top of each other and the glasses you have to wear separate the two images.
Polarised Images
The latest generation of stereo movies are projected by two lenses. Each image of the pair is polarised so that if you wear polarised glasses each eye can see only one of the image pairs.
Polarised glasses: such systems apply two sets of polarised light filters. An image is projected through one pair of these filters. There is a different polarity between the right and the left view. The observer wears glasses with another pair of filters. Regular polarised sunglasses will not work because the angle of the lenses in the glasses must match the angle of the angle of the projected light in order to make this system work.
An image passes through the filter with matching polarity while the opposite polarity is blocked. Polarised systems are better than colour-filtering ones because the viewer sees full-colour pics.
However, polarised systems still have some disadvantages. They require two projectors (similar to those in movie theatres) or limit the resolution (like interleaved television displays).
Active shutter 3D glasses
Active shutter 3D glasses: the typical feature of such systems is that every other frame, the display is switched between the right and left views. These are wireless glasses synchronised with the display.
They have LCDs and black out the necessary eye when it is required. The displays should run at 48 fps instead of 24 fps. These are one of the best systems in terms of quality, but they are quite expensive.The results are breathtaking stereo projections with incredible depth, breadth, and colour.
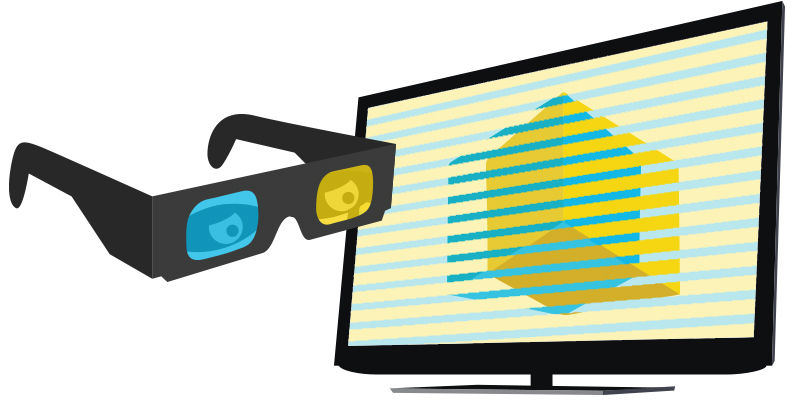
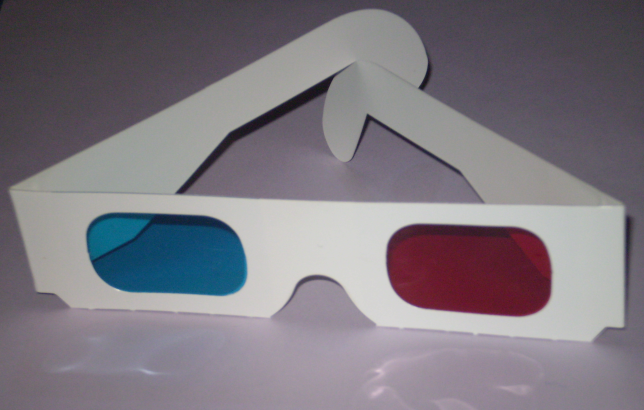
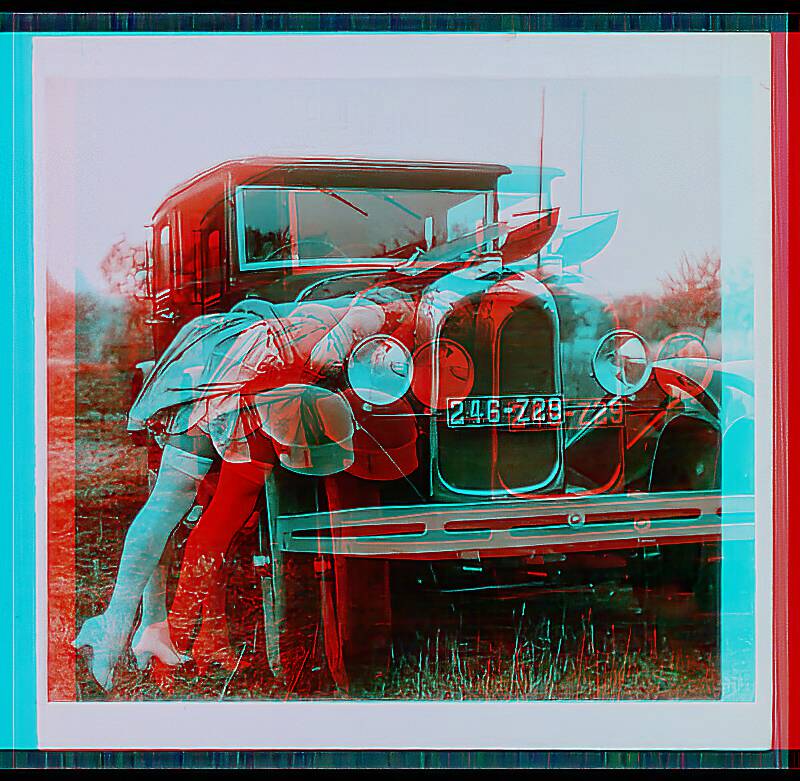
Anaglyphs.
If you print one image in blue and the other in red on top of it, with red and blue glasses the eye perceives depth. Anaglyph comic books and movies were popular in the 1950s, and anaglyph photos are still produced by artists although the medium limits the fidelity of colours in colour photographs.
Anaglyphs enjoyed a resurgence in popularity recently when, on July 4, 1997, Pathfinder landed on Mars and began transmitting colour anaglyphs. The Jet Propulsion Lab (JPL) posted pictures of the six-wheeled Sojurner trundling around in the dust visiting rocks named Barnacle Bill and Scooby Doo.
Anaglyphs are also used in electronmicrographs, Xrays, and aerial cartography. You probably have a pair of cardboard mounted anaglyph glasses around the house.
These systems work according to the following principle ‒ the right and left views are superimposed on the screen. As a result, these glasses filter the picture in such a way that each eye sees only the appropriate view.
Color-filtering glasses: they display the image in two colors. Such glasses selectively filter out the opposite color image using colored gels. The most popular colors are Blue/Yellow, Red/Cyan and Green/Magenta.
Converting images between stereo formats
I use StereoPhoto Maker Pro to convert images between formats.
It is available for a PC and now available for a Mac although it is a PC software in a shell to work on the Mac
here. It is free software.
You can download a user guide
here
Standard IMAX
Some IMAX movies are also polarised images.
Standard IMAX movies are 2D projections from large films shot with a wide view panoramic camera. But some are stereographs and can be viewed with polarised glasses or with active shutter liquid crystal shutters that strobe rapidly in sync with the projection.
HOW TO VIEW STEREO IMAGES
There are two ways to show pairs of Stereo images Parallel and Crossed.
First I show the images in parallel and to view these you need a viewer of piece of card. Hold a stiff sheet of paper or cardboard vertically between your eyes and line it up with the center of the image you are trying to view. Removing the distraction of the extra images helps some people to learn to view the image.
In Crossed you need to teach yourself to view the images cross eyed.
When you view 3d images in a viewer or with 3D glasses the optics of the viewer (or glasses) allow the left eye to see only the image intended for the left eye and the right only the image intended for it.
Without glasses both left and right images are always visible so you need to learn to point each eye at the correct image. But with some practice most people can learn to view parallel and crossed-eye images. Most people can learn to view both though most find one type easier to view.
Click on any image for enlarged image and navigation views.
Learning to Parallel Freeview: In parallel stereo image viewing the image for the left eye is on the left and the image for the right eye is on the right. You stare into the screen so that your eyes are aimed (more or less) parallel. As you stare into the screen you will get double vision as each eye sees the L & R images separately. When you are staring in at the right distance the middle two images will overlap and become 3d. The outer two images will remain and will still be 2d
In cross eye viewing the image for the left eye is on the right and the image for the right eye is on the left. You stare at a point about 1/2 way to the screen so that your eye's gaze is crossing at the half way point. Thus the left eye sees the correct image which is on the right. As you cross your eyes the image will go double. When your eyes are crossed the correct amount the middle images will overlap and be in 3d. The two outer images will remain and will be in 2d.
Hold up a finger or pen in front of the image about 1/3 to 1/2 way to the screen. Look at the pencil but concentrate on the doubled images on the screen. Move the pencil closer or further until they overlap to produce three images. The center one should be 3d, but out of focus. Then you need to shift your focus onto the center image without having it jump back to 2d.
Another trick is to cut a square hole about the size of the image (the left side, say) in a sheet of paper. Hold this about half way between your eyes and the screen, centred between your eyes. When done properly it allows each eye to only see its own image. Removing the distracting extra images can help during the learning process.
Click Link
For Information
On Stereo
Photography
Click Link
For Information
on The
Stereo Widow
LINKS TO CREATIVE STEREO IMAGES
Click Link
For Vieussan
Stereo
Images
Click Link
For Herepian
Stereo
Images
Click Link
For Olargues
Stereo
Images
Click Link
For Bédarieux
Stereo
Images
Click Link
For
Villemagne-l'Argentaire
Stereo Images
Click Link
For
Boussagues
Stereo Images
Click Link
For Faugères
Stereo
Images
Click Link
For FOS
Stereo
Images
Click Link
For
Gorges d'Heric
Stereo Images
Click Link
For
Cirque de Moureze
Images
Click Link For
Colombieres-sur-Orb
Stereo
Images
Click Link For
Passa Pais Stereo
Images
Click Link
For Creative
Painted
Stereo
Images
Click Link
For IR
Stereo
Images
Click Link
For Minerve Stereo
Images
Links to IR and UV Stereo Images
Click Link
ZBW2 Stereo
Images
Click Link
ZB3 Stereo
Images
Click Link
QB1 Stereo
Images
Click Link
CB580 Stereo
Images
Click Link
850nm Stereo
Images
Zeiss
STEREOTAR C
CONTAX 3D
35mm f3.5